
☆ Intro
This page will take you through everything you need to get the basic modded setup on your machine.
This includes setting up XIV Launcher, which gives you access to tools such as Dalamud, which we will be using to install the plugins we need for modded items.
This launcher also just comes with so many nice quality of life improvements, such as locally remembering your passwords so you don't need to keep signing in when you launch the game, which is huge imo.
Please remember this page is very early days and both the words and pics may change!
☆ XIVLauncher
Head over to THIS LINK! and download the latest release of XIVLauncher from GitHub.
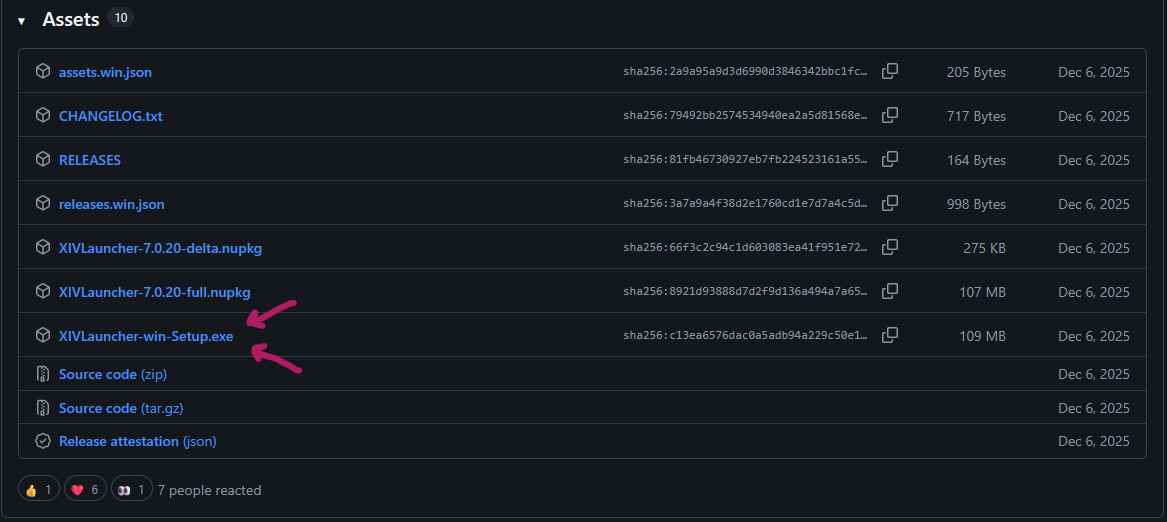
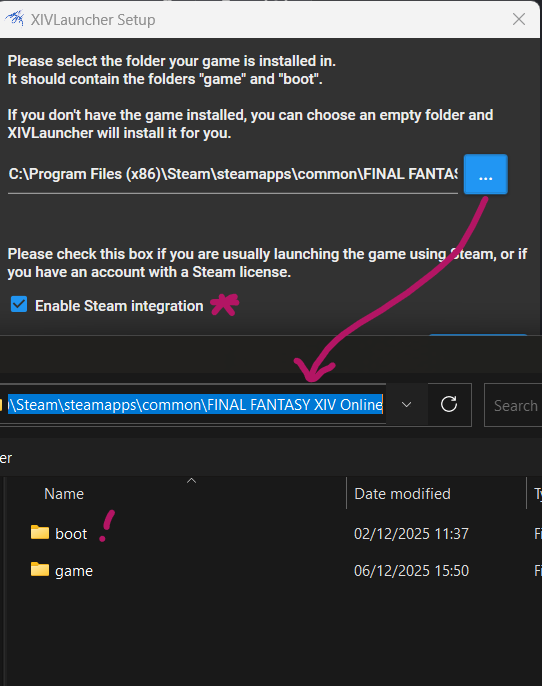
Run the installer and follow the steps, making sure to tick the box if you use Steam. It should auto detect the game's location, but if not, you are looking for the game folder with the boot folder in it, as shown below.
If you are using Steam, you can find this by right clicking the game in Steam and going to Properties > Installed Files > Browse
Press Next on the installer, then select your language.
MAKE SURE YOU LEAVE "ENABLE DALAMUD" TICKED. This is what we use to run our plugins.
Sign in. Make sure you tick "Use Steam Service account" if your account is linked to Steam. Let it run any updates it needs.
If you are logging in via Steam, make sure you have Steam open during the login process or it will fail.
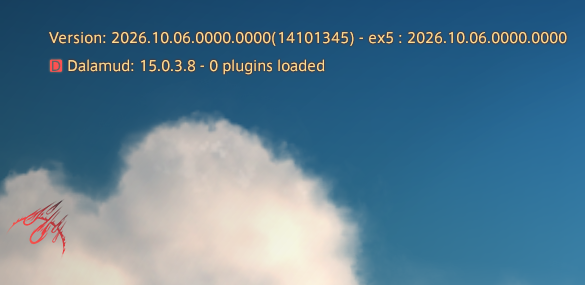
Once the game launches, you should see a red logo on the left along with a version number on the top left. This means it's worked!
Next up are plugins! I'll show you how to install them and leave some -USEFUL REPOS- in -THE NEXT- section!
☆ Dalamud
So, you have Dalamud set up! What's next?
This section will walk you through what Dalamud actually does, how to install basic plugins and, importantly, how to install plugins from custom repositories (repos). These include Penumbra, which loads and manages your mods, Glamourer, which lets you change your character's appearance and displayed gear (useful for testing and using mods), and either Lightless or PlayerSync.
Lightless, PlayerSync and Rava are all plugins that are used to synchronize your mods with your friends and vice versa. Make sure you install the same one your friends use if you want to be able to see them. Don't worry, you can install more than one option.
Side side note: some of the repos on this page and my repo directory page may be out of date, but I will try and keep them updated. Feel free to leave a comment in chat or my guestbook if you see any issues.
Please remember this page is very early days and both the words and pics may change!
Ok, let's launch into the game and log in!
Once you are logged in, hit Escape and you will notice 2 more options appear in your settings menu: Dalamud Settings and Dalamud Plugins.
For now, let's hit Dalamud Plugins and you will see a new UI pop up with a BUNCHHHH of options. Feel free to scroll through these, but for this guide we are going to move on to Settings to add some custom repos first! You can get to this by clicking the settings icon on the bottom left of the plugins page.
Open the settings, then go to the "Experimental" tab shown below. Scroll down a little until you find "Custom Plugin Repositories". You will have to wait for the timer to run down before you can click OK.
This is where we will add any custom repositories you want. For convenience, I made a bunch of quick descriptions and links over at this link!
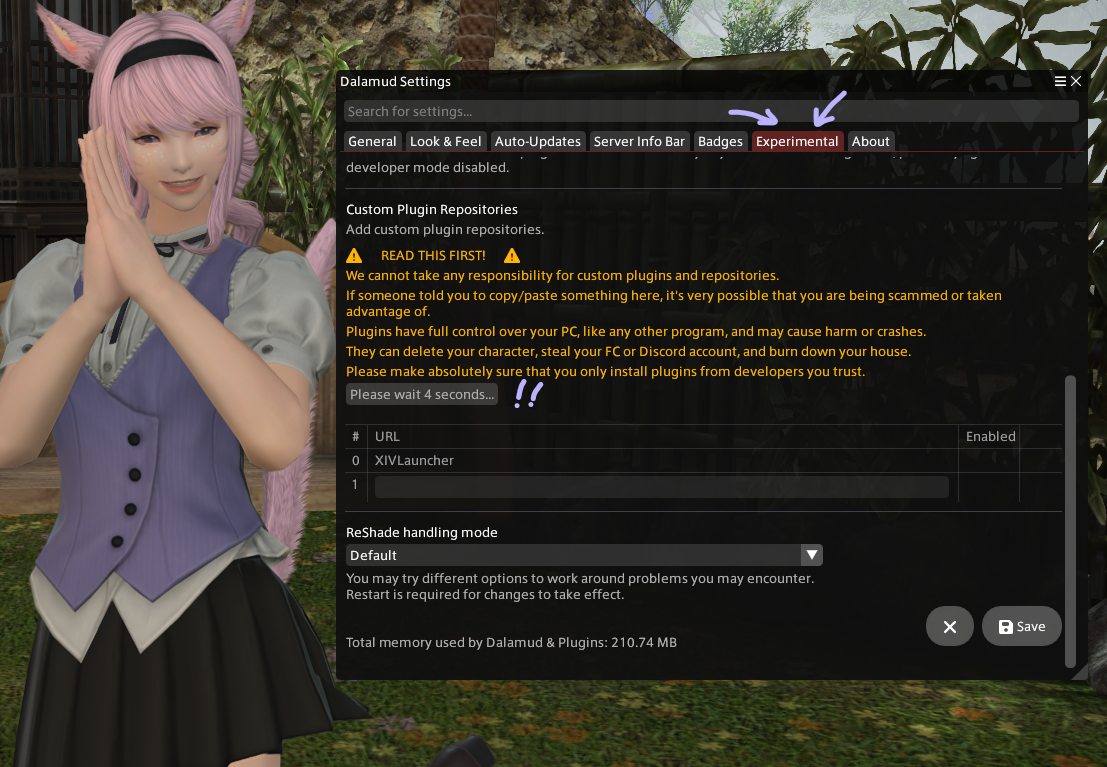
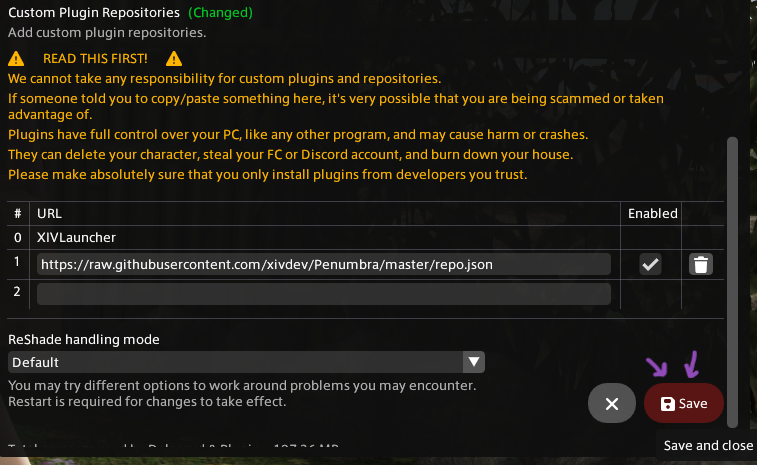
Grab the Penumbra link from below and paste it into the text field under URL. Once it's in, hit the little + symbol to the right of that row.
(Ive also included the glamourer link as it will be very useful for anyone using penumbra to allow you to change clothes and test. Put these on seperate lines if you wish to use it)
-
https://raw.githubusercontent.com/xivdev/Penumbra/master/repo.json
-
https://raw.githubusercontent.com/Ottermandias/Glamourer/main/repo.json
MAKE SURE YOU HIT SAVE AT THE BOTTOM!!! I've forgotten to do this so many times and had to come back to re-add links ugh.
Return to your plugins window and search for Penumbra at the top! (If you closed it, you can find it again by hitting Esc or your bound menu key.)
You're looking for a moon icon. Click this, then click Install and let it do its thing.
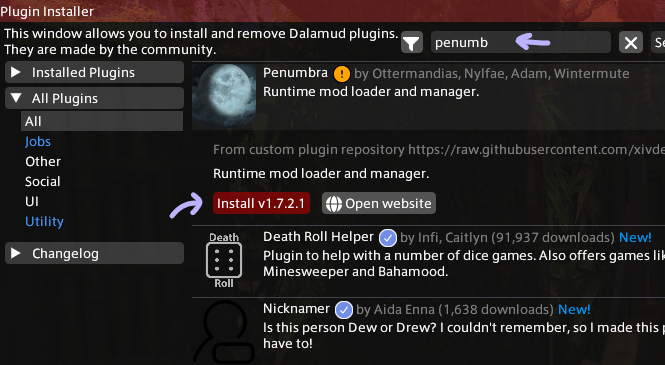
Congrats, you now have access to Penumbra! You can open its menu by typing /penumbra whilst it's enabled, or by hitting Open in the plugin window.
☆ Penumbra
I will only take you through the very basics here. More advanced stuff can be found in my other guides (WIP).
Open Penumbra (/penumbra in chat) and follow the setup tutorial. The most important step here is picking a root directory. Make sure this isn't in the same folder as your FFXIV install. I put mine in Documents/FFXIVMods, for example.
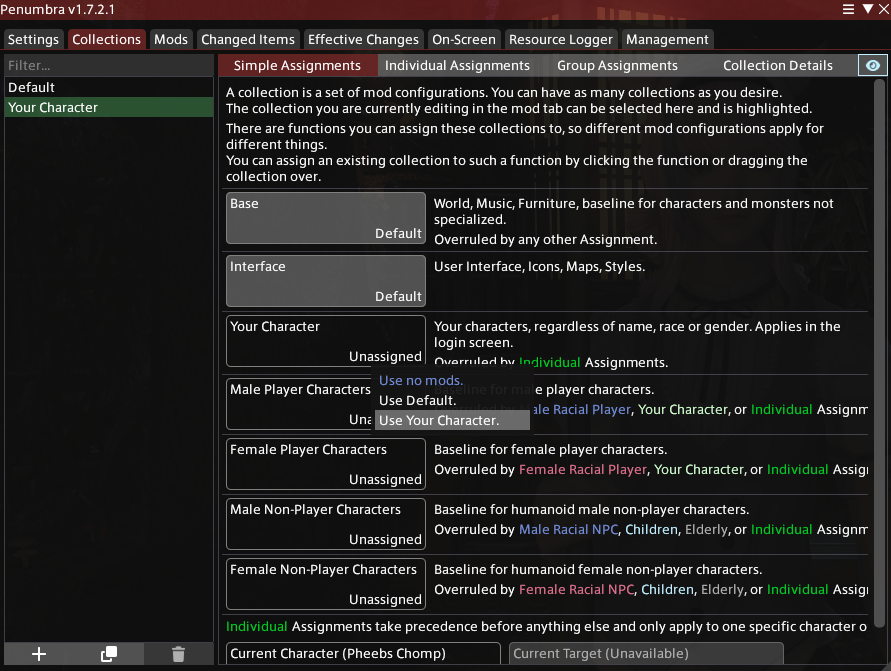
Let's set up collections! Save your root folder, then head over to the Collections tab.
Hit the + icon on the bottom left and name it whatever you want (I recommend naming it after your character).
Hit Enter to create it, then move to the boxes on the right. You're looking to click on the "Your Character" box, then press "Use (your collection name)" as shown below. If done right, the box should go green.
This step is optional, but it allows you to set which characters your mods appear on, so it's HIGHLY recommended. That way you can limit them to yourself and not break your game world.
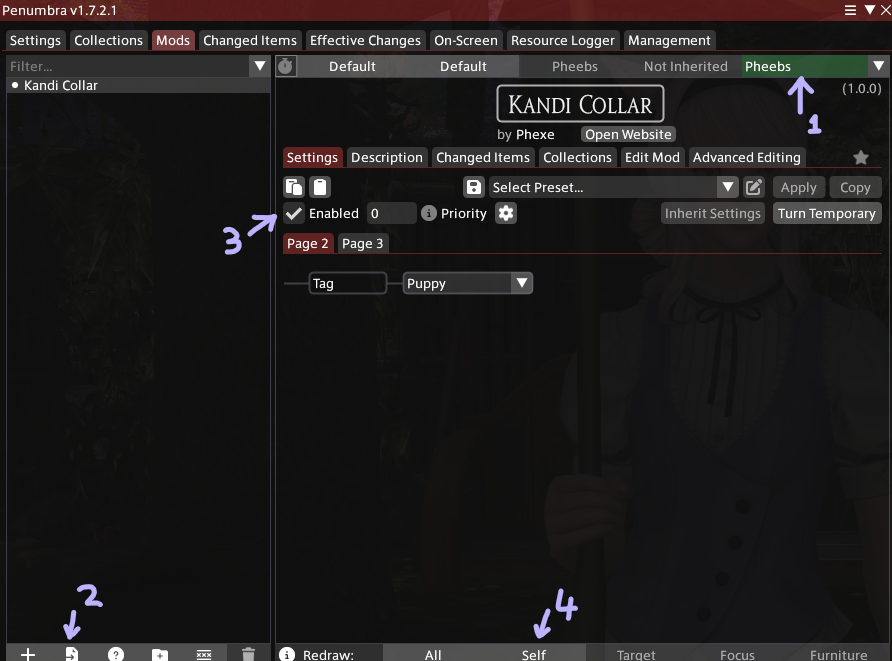
Final step is adding mods :3. Let's move over to the Mods tab. On the far right, make sure the drop-down list is set to your character's collection. This should be on by default.
Click the file icon on the bottom left with the little arrow pointing to the right and select your .pmp/.ttmp file.
Make sure it works with the new DT update, as older mods might have material glitches. You can find out how to update them in this guide (WIP, coming soon).
Once your mod is imported, simply tick Enabled, go through the settings if it has any, and then boom! You have your first mod installed!
If you have Glamourer set up, you can go to the Changed Items tab and right click on the item to see it on your character.
Next step is finding and setting up a plugin to sync your mods to friends! I added some in my Repo List.
Download XIVLauncher> Run it and let it install> Open FFXIV> Log in to game and open your settings> Click Dalamud settings> Go to Experimental> Add Penumbra + Glamourer + Sync repo of your choice> Go to penumbra> Set root away from game> Set up collection for character> Install Mods> Set up Glamourer and finally set up your sync